
Cleaning Up Sketches
Edit geometry you've already drawn — trim and extend curves, break them apart, round or bevel corners, and create parallel offsets.
Everything so far has been about drawing new geometry or constraining it. This chapter covers a different category of tool: reshaping geometry that already exists — trimming away excess, extending a line to meet another, rounding a sharp corner, and more.
Prerequisites
Before you begin, ensure that:
- You've completed Constraining a Sketch and are comfortable drawing and selecting sketch geometry.
Finding These Tools
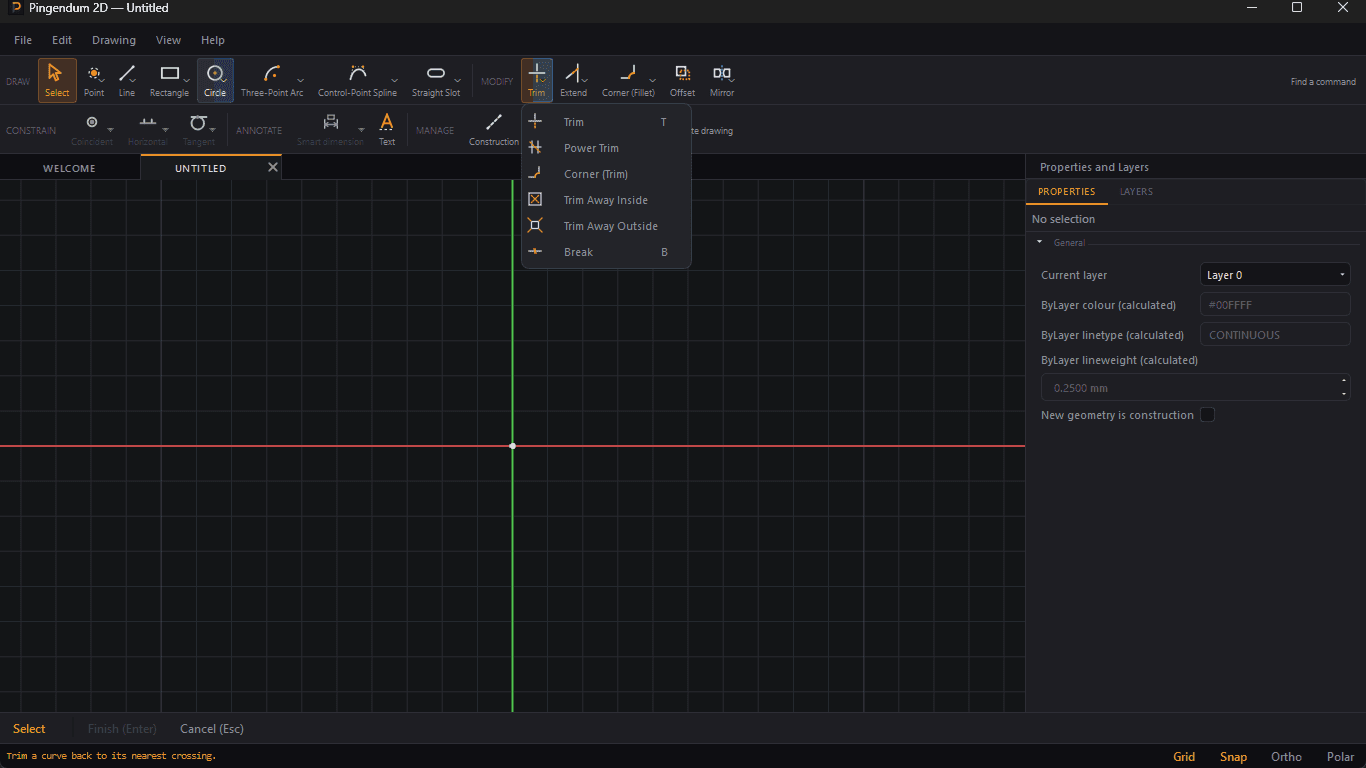
The eleven tools in this chapter live on the MODIFY group of the toolbar, spread across four controls rather than one. Three are split buttons with a drop-down; Offset is a plain button on its own.
| Control | Default face | What's in its drop-down |
|---|---|---|
| Trim | Trim (T) | Trim, Power Trim, Corner (Trim), Trim Away Inside, Trim Away Outside, Break (B) |
| Extend | Extend | Extend, Extend to Element |
| Corner | Corner (Fillet) (Shift+C) | Corner (Fillet), Chamfer (Shift+H) |
| Offset | Offset (O) | — no drop-down |
A fifth control in the same group, the transform split button, holds Mirror, Translate, Rotate, Scale and Symmetry — those are covered in Transforming and Duplicating Sketch Geometry.
Note: the button face follows you
Picking a tool from a drop-down makes it that button's new face, and the choice is remembered between sessions. It follows however you started the tool — clicking it, pressing its shortcut, or finding it with
Ctrl+Shift+Pall move the face — so the button ends up showing whichever variant you actually use.
Note: one name to know
The toolbar calls the rounding tool Corner (Fillet), sharing the word Corner with the quite different Corner (Trim). This chapter uses the shorter Fillet for the first; every other tool is named here exactly as the toolbar names it.
Trim
Trim shortens a curve by removing the portion between two intersection points.
How it works: click anywhere along a curve. If it crosses other geometry, the specific segment you clicked between the two nearest intersections is deleted, and the curve is shortened to meet them. If the curve has no intersections at all, clicking it deletes the whole thing. The tool stays active afterward, so you can trim several curves in a row without reselecting it.
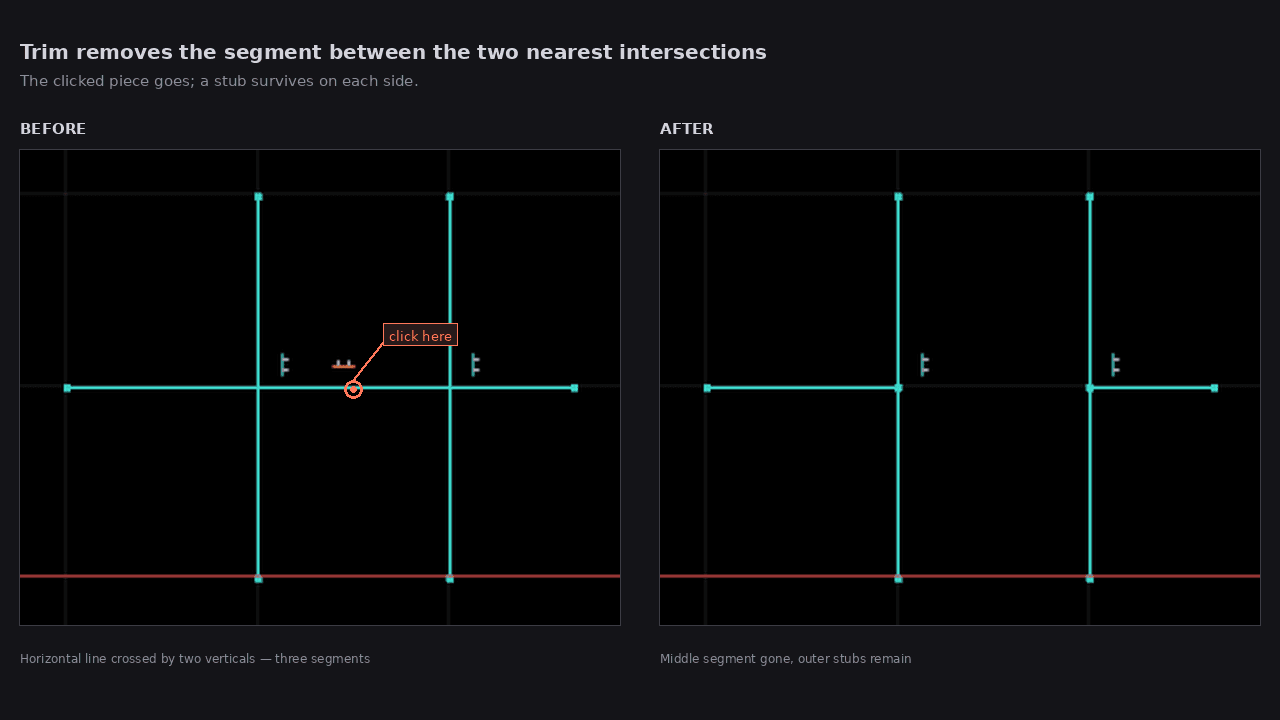
Hover before you click. Trim previews the result continuously: the piece that will be removed is drawn in the delete style, the pieces that will survive in the normal one, and a hint names the outcome — "Trim to closest boundary", or "Split into 2 pieces", or "No trim boundary found — entire entity will be deleted". If the preview isn't what you meant, move the cursor rather than undoing afterwards.
Note
Circles behave a little differently: with two or more intersections, the clicked arc segment is removed and the rest survives as an arc. With zero or one intersection, the whole circle is deleted — there's no way to trim a "sub-arc" out of an otherwise-untouched circle.
Trim's option keys
Trim carries five keys that change what counts as a boundary and what happens to the removed piece. All five are on by default in the sense that Trim behaves the most forgiving way it can; the prompt grows a chip like [Real only · No auto-delete] for each one you turn off, so the current state is always readable.
| Key | Effect when you press it |
|---|---|
Tab | Cycles which entity is targeted where several overlap under the cursor |
E | Stops treating extended (virtual) intersections as boundaries — chip: Real only |
B | Stops treating construction geometry as a boundary — chip: Ignore constr. bounds |
K | Keeps the trimmed-away piece as construction geometry instead of deleting it — chip: Keep as construction |
D | Stops deleting a curve outright when it has no boundary at all — chip: No auto-delete |
E is the one worth knowing. By default Trim will cut a curve at a point where another curve would cross it if both were extended — useful most of the time, surprising occasionally. Press E and only real, drawn crossings count.
Extend
Extend does the opposite of Trim: it lengthens an open line or arc until it meets the nearest other curve. That "nearest" is the whole difference between it and Extend to Element below, which lets you name the curve to stop at.
How it works: hover near the open end of a line or arc — the endpoint closest to your cursor is the one that will move. Click to extend it until it hits the nearest curve in that direction. Like Trim, the tool stays armed for extending multiple curves in a row.
Note
Extend moves the endpoint directly; it doesn't add a solver constraint linking the two curves. If you move the curve it was extended to meet later, the extended curve won't follow it automatically.
Power Trim
Power Trim has no keyboard shortcut — reach it from the Trim drop-down, or by name with Ctrl+Shift+P.
Where Trim removes one segment per click, Power Trim removes everything a dragged stroke crosses. Press the mouse down and sweep the cursor through the segments you want gone — each curve the trail crosses is trimmed at the crossing point as you pass it.
The whole stroke is a single undo step, so one Ctrl+Z puts back everything the sweep removed. This is the tool for clearing a tangle of construction leftovers quickly.
Extend to Element
Where Extend lengthens a curve until it meets whatever is nearest, Extend to Element lets you say exactly which curve to stop at.
Steps
- Click the entity you want to modify.
- Click the boundary entity it should stop at. The boundary is left unchanged.
- If the two could meet at more than one place, press
Tabto cycle the candidates. - Click or press
Enterto confirm.
It works on lines, arcs and circles, and it will shorten as readily as lengthen — if the target already passes the boundary, it's trimmed back to it.
Unlike Corner (Trim), no shared endpoint is created; the two curves meet at a position but aren't joined.
Corner (Trim)
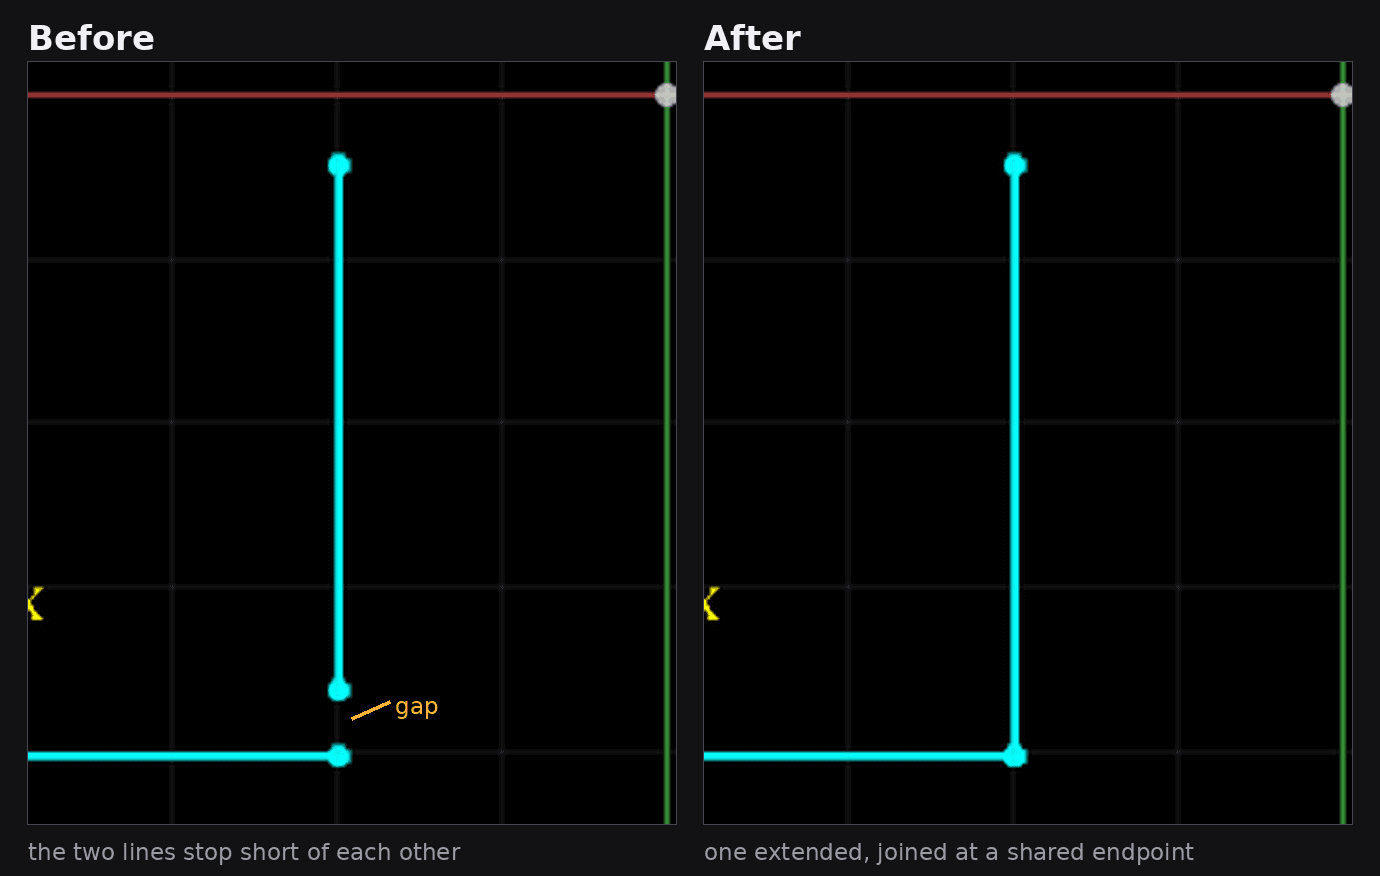
Corner (Trim) takes two curves that don't meet and makes them meet — trimming or extending each as needed until they touch at a shared endpoint.
Steps
- Click the first entity, near the side you want to keep.
- Click the second entity, again near the side to keep.
Tabcycles other candidate intersections if the curves could meet more than once.- Click or press
Enterto confirm.
Result
The two curves now share an endpoint — a genuine corner, not just two ends at the same place. That distinction matters when the profile has to read as a closed region, and it is the difference between a clean DXF export and one full of near-miss gaps.
Note: Corner (Trim) and Fillet are different tools
Corner (Trim) makes a sharp corner and inserts nothing. Fillet (later in this chapter) makes a rounded corner by inserting a tangent arc. Similar names, opposite results.
Trim Away Inside and Trim Away Outside
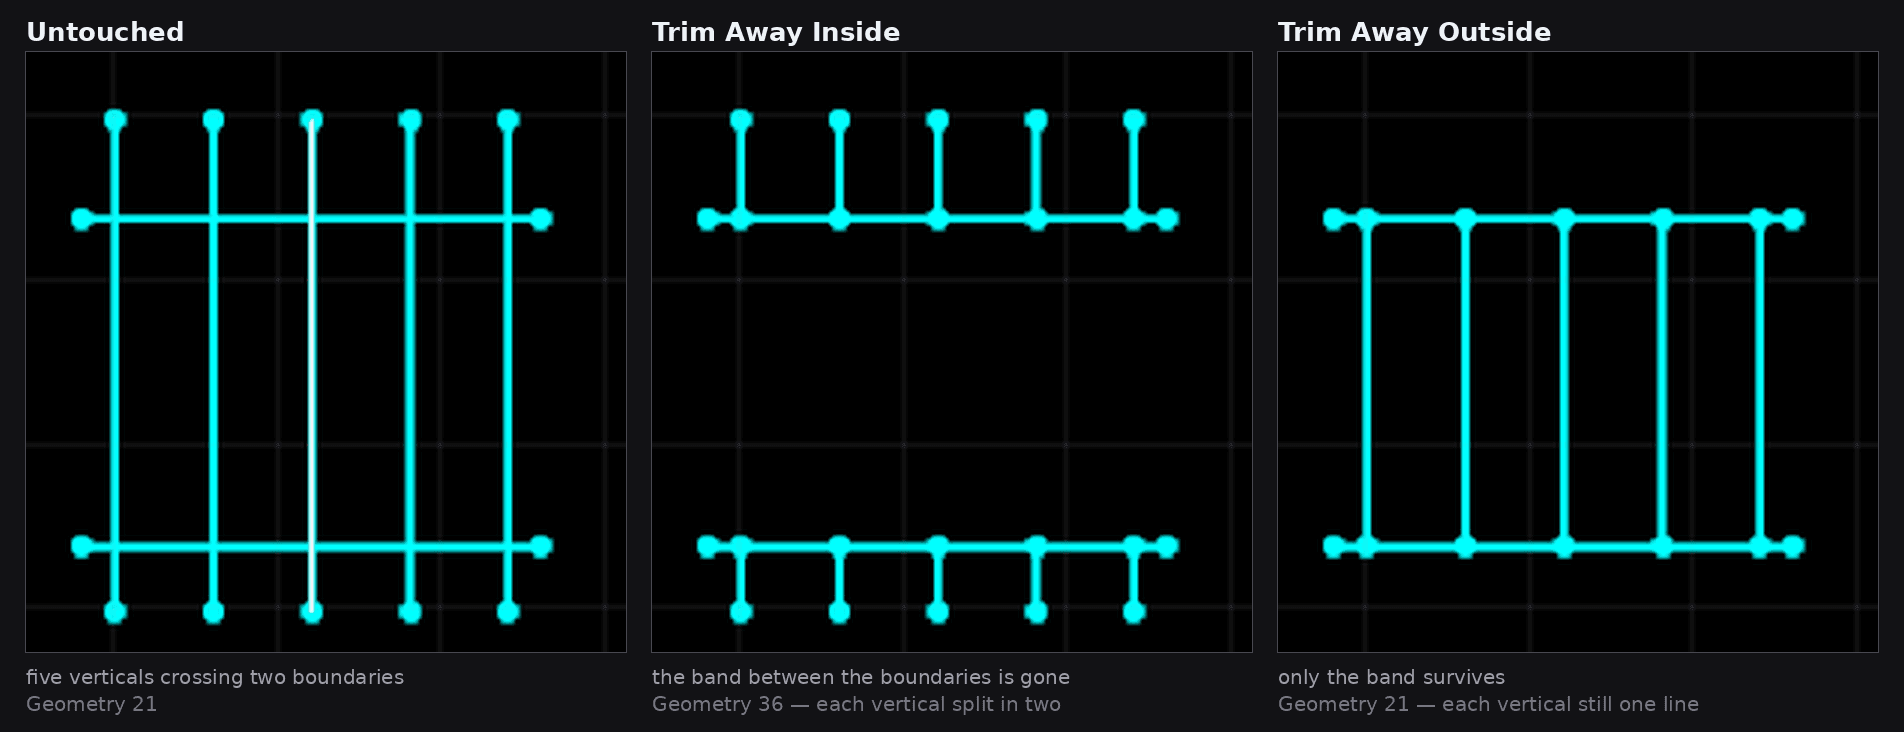
These two trim everything between a pair of boundaries, or everything outside them — useful for cutting a window out of a dense region rather than clicking segments one at a time.
Steps
- Click Boundary 1. If it's a closed loop — a circle, full ellipse, or periodic spline — press
Enterto use it alone and skip step 2. - Click Boundary 2. It must be a different entity from the first.
- Click or drag across the entities you want trimmed. Each is cut immediately against the region.
- Press
EnterorEscapeto finish.
Important: your cursor decides what "inside" means
Two open boundaries don't define an inside on their own — a pair of parallel lines splits the sketch into three regions, not two. Pingendum resolves this using where your cursor is: whatever lies on the same side of both boundaries as the cursor is the inside region, and it re-evaluates live as you move.
So with two horizontal boundaries, clicking a target between them makes the middle band the inside; clicking above both makes the upper region the inside instead. Trim Away Inside then removes that region, and Trim Away Outside removes everything else.
This is why the preview updates as you move the mouse before clicking — it's showing you which interpretation you're about to get. Watch it, and click where the region you mean contains your cursor.
Note
Tip: check the entity count
After Trim Away Inside, each trimmed line is split into two, so the GEOMETRY count in the Properties panel jumps — five verticals take it from 21 to 36. After Trim Away Outside each line stays whole and the count is unchanged. If the count doesn't move when you expected a split, the region wasn't what you thought.
Clicking a boundary as though it were a target gives "That entity is a boundary, not a target." Picking the same entity for both boundaries gives "Boundary 2 must differ from Boundary 1."
Break
Break splits a single line or arc into two pieces at whatever point you click.
How it works: hover over the curve, click the point where you want the split. A line becomes two lines meeting at that point; an arc becomes two arcs sharing the same centre and radius. Conic segments and five-point conics split too, into two conics of the same family.
Circles can't be broken. Use Trim on a circle instead — with two or more intersections it removes the clicked segment and leaves the rest as an arc, which is the same result by a different route.
Note
Constraints on the original curve are generally preserved, since most reference the endpoints' parameters rather than the curve itself — but Pingendum doesn't duplicate a constraint onto both new halves, so double-check DOF after a Break if you were relying on one.
Fillet
Fillet rounds off the sharp corner where two curves meet, replacing it with a tangent arc.
Steps
- Click the first entity, near the side you want to keep.
- Click the second entity, again near the side to keep.
- An inline number prompt (the same style as the Length constraint prompt) asks for the fillet radius. Type a value,
Enterto commit, orEscapeto cancel.
Which side you click matters: it's how Pingendum decides which half of each curve survives and which is trimmed away. The prompt says so at each step — "Fillet — click the first entity near the side to keep".
Result
Both curves are trimmed back from their intersection, and a tangent arc of your chosen radius connects them.
It works on more than lines
Fillet accepts lines, arcs and circles, in any combination — line-to-line, line-to-arc, arc-to-arc, and circles too. Pick something else and the prompt says "Fillet supports lines, arcs, and circles".
That matters because those pairings often have more than one valid answer — two circles can be blended by an arc of the same radius in several places. When they do, the preview says "Fillet (Tab for other solutions)" and Tab steps through them. Watch the preview and press Tab until it shows the one you meant, then commit.
Three more keys, once the first entity is picked
| Key | Effect |
|---|---|
T | Cycles how the source curves are treated: Trim Both (the default) → Trim First → No Trim |
K | Creates the fillet arc as construction geometry instead of normal geometry |
V | Preserves the virtual corner — keeps the original intersection point as a reference after rounding |
Each announces its new state in the prompt, so you can check before committing.
Note
If the two curves you pick can't produce a fillet at the current radius — parallel lines with no intersection, or a radius too large to fit — Pingendum refuses with a status-bar message rather than guessing. It will quietly try a smaller radius once before giving up, so a stale value left over from a previous, larger fillet usually just works.
Chamfer
Chamfer is Fillet's straight-edged sibling: instead of a rounded arc, it connects the two lines with a straight bevel.
Unlike Fillet, Chamfer is lines only — pick anything else and the prompt says "Chamfer supports lines only".
Steps
- Click the first line, near the side you want to keep.
- Click the second line.
- Answer the inline number prompts. How many there are depends on the chamfer type, which the prompt names throughout — "Chamfer (Equal Distance) — click the first line, near the side to keep".
Three chamfer types, cycled with C
Press C at any point to cycle the type. It's also a control on the Tool Options row, so you can pick it there instead.
| Type | Prompts you get | Use it for |
|---|---|---|
| Equal Distance (default) | Distance: | The symmetric 45° bevel — both legs cut back the same amount |
| Two Distances | D1: then D2: | An asymmetric bevel, cut back further on one leg than the other |
| Distance and Angle | Distance: then Angle (deg): | A bevel specified the way a drawing note usually gives it — one setback and an included angle |
For Two Distances, D1 applies to the first line you clicked and D2 to the second, so the click order decides which leg gets which. The angle in Distance and Angle must be between 0° and 180°; anything else is refused and returns you to the second click.
Two more keys, once the first line is picked
| Key | Effect |
|---|---|
T | Cycles source treatment: Trim Both → Trim First → No Trim |
K | Creates the bevel as construction geometry instead of normal geometry |
Result
Both lines are trimmed back according to the active type, joined by a new straight line. Like Fillet, a pair that can't produce a bevel — parallel lines, or distances too large to fit — is refused with a status message.
Offset
Offset builds a parallel copy of a curve — or of a whole connected chain — at a distance you specify, leaving the original in place.
It is the most capable tool in this chapter and the one least like the others: it works on chains, not just single curves, and the result it creates is associative by default, meaning it stays linked to the source.
Steps
Offset runs in two stages, and the prompt tells you which one you're in.
- Pick the source. Hover a curve — Pingendum highlights the whole chain it would take — and click to select it. The prompt reads "Offset — select a curve, chain, loop, or profile to offset". If you already had geometry selected when you started the tool, that selection is adopted and this stage is skipped.
- Choose the side and distance. The prompt becomes "Offset — move to choose the side, then click or enter the distance". Move the cursor to whichever side you want the copy on; the preview follows, showing the complete result — children, corners, caps and all. Then either click to commit at the cursor's distance, or type a value and press
Enter. A negative typed value flips to the other side.
Escape steps back one stage: from the side stage it returns you to source selection; from source selection it clears the tool.
Result: an associative offset
This is the important part, and it's what separates Offset from a plain copy.
By default Offset creates the new geometry linked to its source. Behind it Pingendum builds a constraint web, a shared distance parameter, and a driving Offset dimension — all as a single undo step. Edit the source and the offset follows; edit the offset dimension and the whole offset moves.
That link is real enough that deleting offset geometry asks you what you mean:
This selection is controlled by an Offset relation. Delete the complete offset, detach it, or cancel?
- Delete Offset removes the whole offset result.
- Detach cuts the link and leaves the geometry behind as ordinary, independent curves.
- Cancel changes nothing.
If you wanted an unlinked parallel copy in the first place, turn Associative off with A before committing.
How much gets picked up: chain mode
The C key cycles what a single click selects:
| Chain mode | A click selects |
|---|---|
| Single | Just the one curve you clicked |
| Connected (default) | Every curve joined end-to-end to it |
| Tangent | The run that continues smoothly, stopping where the tangent breaks |
| Loop | The complete closed loop it belongs to |
The active mode is named in the prompt, and hovering shows you what it would take before you commit to it.
The other option keys
All seven options are keys and controls on the Tool Options row, so you never have to remember a letter.
| Key | Option | Choices |
|---|---|---|
C | Chain | Single · Connected · Tangent · Loop |
M | Direction | One side · Two sides · Symmetric |
R | Corners | Natural · Sharp · Round · Bevel |
B | Cap ends | None · Line · Round |
T | Topology | Match source · Allow simplification |
A | Associative | On · Off |
Q | Repeat equal | On · Off |
Two more keys are actions rather than options: F flips the offset to the other side without moving the cursor, and Backspace undoes the last source pick.
- Direction decides whether you get one offset, one on each side, or a symmetric pair straddling the source.
- Corners decides what happens where two offset segments meet on the outside of a bend — carry the natural curve out, meet at a sharp point, round it, or bevel it.
- Cap ends closes an open chain's ends between source and offset, turning a run of curves into a closed shape.
- Topology decides whether the result must mirror the source curve-for-curve, or whether Pingendum may simplify it.
- Repeat equal keeps the tool armed after a commit with the distance locked, so you can lay down several equally spaced offsets in a row.
Enterfinishes,Escapesteps back.
Tip
The two you'll reach for most are
CandA.Cwhen a click grabbed more or less than you wanted, andAwhen you want a plain copy rather than a linked one.
Next Steps
You now know how to:
- Find all eleven tools across the four controls that hold them
- Trim excess geometry and extend curves to meet each other
- Split a curve in two with Break
- Round a corner with Fillet — on lines, arcs or circles — and bevel one with Chamfer in any of its three types
- Create an associative offset of a curve or a whole chain, and tell it apart from a plain copy
- Reach each tool's option keys, and read the current state from the prompt
With cleanup tools covered, the next chapter fills in the rest of the constraint palette — the ones beyond the six essentials from Constraining a Sketch.
Next: The Complete Constraint Toolkit
Saving and Managing Projects
Save your work, recognize unsaved changes, reopen projects, and understand the autosave, crash recovery and read-only protections behind them.
The Complete Constraint Toolkit
The eleven constraints beyond the essentials — Parallel, Perpendicular, Tangent, Equal, Concentric, Collinear, Point-on-Line, Midpoint, Symmetric, Diameter, and Angle.