
Getting Started
Learn how to launch Pingendum, create your first project, and become familiar with the workspace.
Welcome to Pingendum!
This guide introduces the application's interface and helps you create your first project. By the end of this guide, you'll understand the main areas of the workspace and be ready to begin creating your first sketch.
Learning Path
If you're new to CAD software, follow the guides in order. Each chapter builds on concepts introduced in the previous one.
Prerequisites
Before you begin, ensure that:
- Pingendum is installed on your computer.
- You can launch the application successfully.
Launching Pingendum
When Pingendum starts, the Welcome screen is displayed.
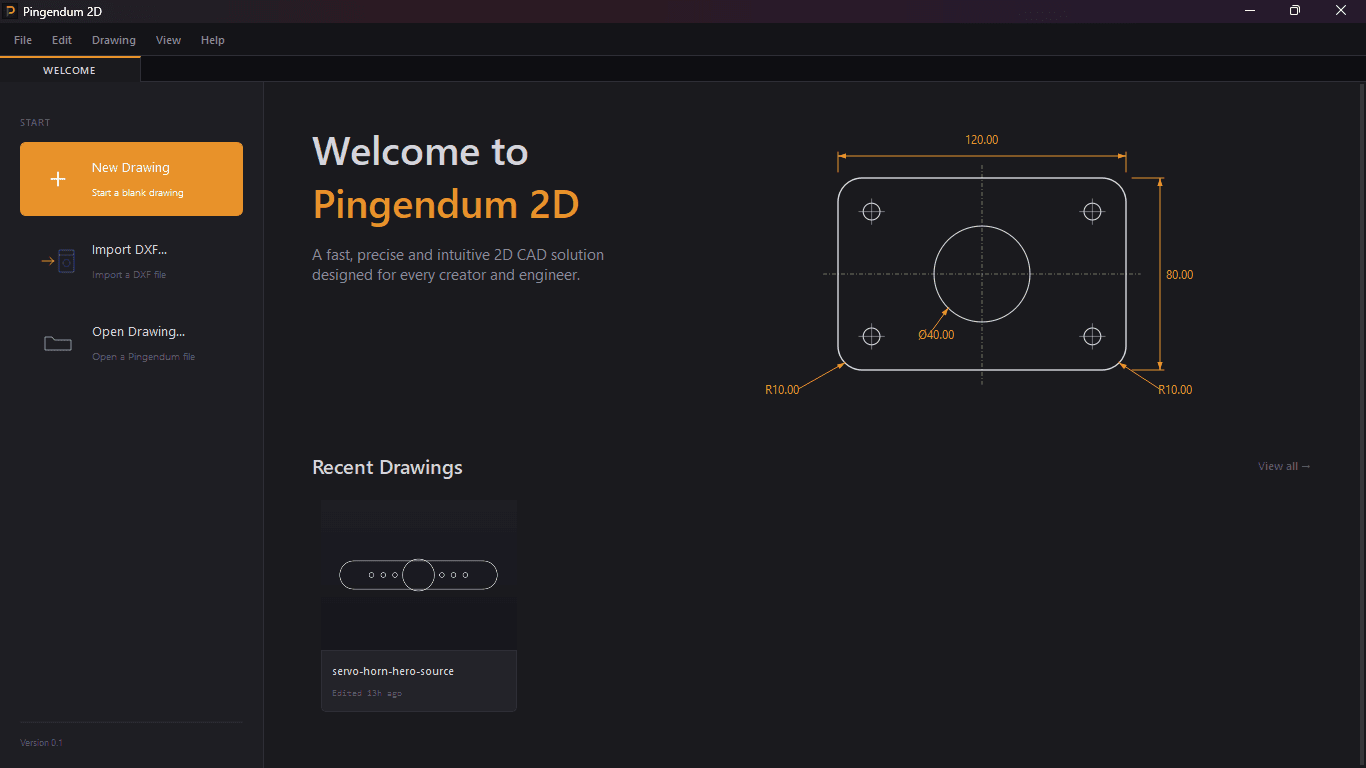
The Welcome screen provides quick access to the most common actions.
New Drawing
Creates a new, empty drawing and opens it in the main workspace.
Import DXF...
Reads geometry from a DXF file into a new drawing. Use this to pick up a drawing produced elsewhere. See also Ctrl+I from within the application.
Open Drawing...
Opens an existing Pingendum project. Use this to continue working on something you've saved.
Recent Drawings
The Recent Drawings section displays drawings you've opened, created, or saved recently, allowing you to quickly continue where you left off.
Tip
If this is your first time using Pingendum, click New Drawing.
Creating a New Drawing
Creating a new drawing takes only a few seconds.
Steps
- Launch Pingendum.
- Click New Drawing (or press
Ctrl+N). - Pingendum creates a new document.
- The application switches to the main workspace.
Result
A new, untitled drawing is created and displayed in the main workspace.
You're now ready to begin drawing.
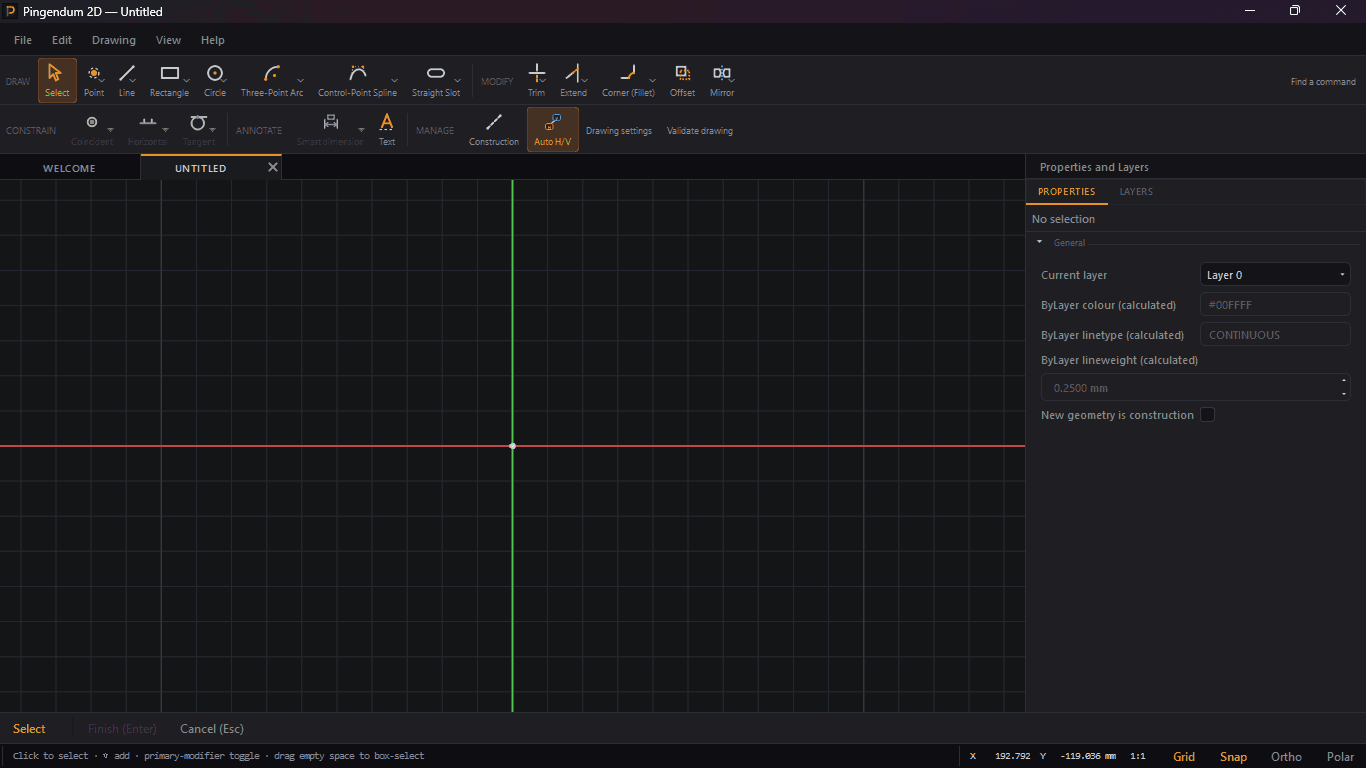
Note
After creating or opening a drawing, the Welcome screen is replaced by the main workspace.
Understanding the Workspace
After creating a new drawing, Pingendum displays the drawing workspace.
This is where you'll draw geometry, constrain it, and dimension it.
Tip
Don't worry about learning every part of the interface immediately. This section provides a brief overview. Each area of the workspace will be explained in more detail throughout the documentation.
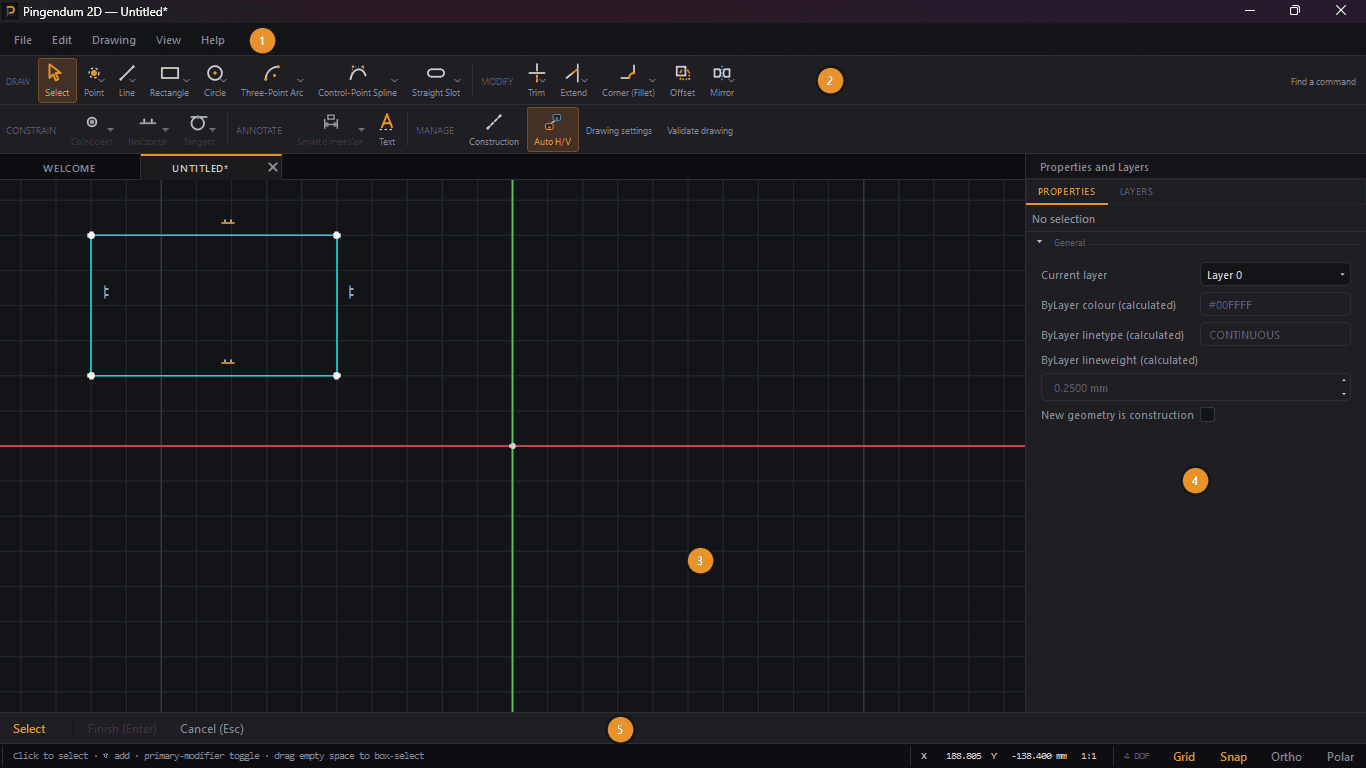
Workspace Overview
Note
The numbered labels in the image correspond to the descriptions below.
The Pingendum workspace is organized into several regions, each serving a specific purpose while you draw.
1. Menu Bar
Located at the top of the application window.
The Menu Bar provides access to all major application commands, organized into five menus: File, Edit, Drawing, View, and Help.
- File — new, open, save, DXF import and export, PDF and printing, sheet setup
- Edit — undo, redo, selection
- Drawing — drawing settings and Validate drawing
- View — fitting and zooming, and Panels
- Help — keyboard shortcuts and about
2. Toolbar
Located directly beneath the Menu Bar, as two rows.
Each row carries labelled groups, separated by a rule:
- Top row: DRAW and MODIFY
- Bottom row: CONSTRAIN, ANNOTATE and MANAGE
They aren't tabs — every group is visible at once. Two rows rather than one because five groups on a single line needed more width than a real window has, which would have left half the commands permanently hidden in an overflow menu.
Within a group, related tools share a split button: one face showing the current tool, and a small arrow opening the rest. Picking a variant makes it the new face, and that's remembered between sessions.
A Find a command button sits at the right-hand end of the top row (Ctrl+Shift+P). It opens a search over every command's name, its aliases and its description — so "oval" finds Ellipse and "bevel" finds Chamfer. It's the reliable way to reach the many tools and constraints that have no keyboard shortcut.
If the window is too narrow for everything, Qt's overflow button appears at the end of a row and holds the rest.
2a. Tool Options
A third, contextual row sits at the bottom of the window, directly above the status bar.
It belongs to whatever command is currently running: the prompt for the step you're on, that tool's options as real controls, and Finish and Cancel buttons. Every per-tool key mentioned in this guide is also a control here, so you never have to memorize a letter.
It's at the bottom deliberately — guidance about the current operation sits with the coordinate readout and the drafting toggles, near the cursor you're actually watching.
3. Viewport
The large central area of the application.
This is your primary workspace where drawings are created, viewed, and edited.
Most of your interaction with Pingendum takes place here.
4. Properties and Layers
Located on the right side of the workspace, and toggled from View → Panels (Ctrl+1).
The Properties tab displays the properties of the currently selected object — its layer, colour, linetype and lineweight, its geometry, and the values of any constraint or dimension you select. With nothing selected, it shows the drawing's current defaults instead.
The Layers tab lists the drawing's layers, with search, and buttons to add, delete and set the current layer.
5. Status Bar
Located at the bottom of the application window.
Reading left to right: a guidance message for the tool you're using, the cursor's X and Y position with its units, the drawing scale, the DOF readout, and the Grid, Snap, Ortho and Polar toggles.
Next Steps
You now know how to:
- Launch Pingendum
- Create a new drawing
- Understand the purpose of the Welcome screen
- Identify the major areas of the workspace
Now that you're familiar with the workspace, the next step is starting your first sketch.
Next: Starting a Sketch