
Expanding Your Shape Vocabulary
The secondary drawing tools tucked behind each toolbar drop-down — construction helpers, alternate rectangle and circle constructions, ellipses, splines, and slots.
Drawing Basic Shapes covered Point, Line, Rectangle, Circle, and the 3-point Arc — the default tool shown on each toolbar group's button face, and the ones you'll use for most sketches. Every one of those buttons hides a drop-down with several more variants underneath, for situations the basics don't handle well: circles built from three points instead of a center, lines built from geometric relationships instead of clicks, closed slots, true ellipses, and more.
This chapter is a reference more than a tutorial — skim it now, and come back to the relevant section when you hit a shape the basics can't produce.
Each tool below is named exactly as the toolbar and Find a command (Ctrl+Shift+P) name it, so you can search for any of them by the heading you see here.
Prerequisites
Before you begin, ensure that:
- You've completed Drawing Basic Shapes and know how to open a toolbar group's drop-down to pick a non-default tool.
Point Variants
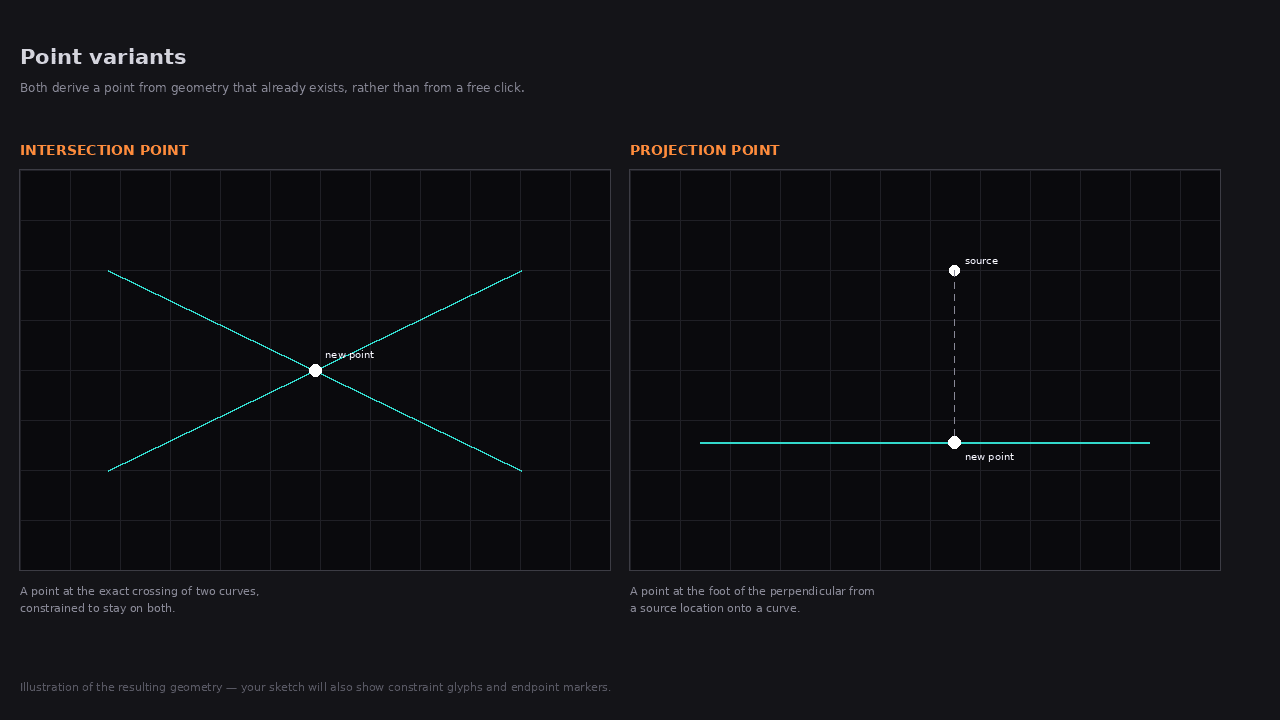
Alongside the plain Point tool (P), two more point tools derive a point's position from existing geometry rather than a free click:
- Intersection Point — click two curves (any pair of lines, circles, or arcs). Pingendum computes their geometric intersection and drops a point there, constrained to stay on both curves.
- Projection Point — click a source location, then click a curve. A point is added at the foot of the perpendicular from your source location onto that curve, constrained to stay on it.
Both are useful for anchoring later geometry to a precise, relationship-derived location instead of eyeballing a click.
Line Variants
Beyond the plain Line tool (L):
- Polyline — click to place a start point, then keep clicking to chain additional straight segments end-to-end, each one committing and immediately starting the next. Press
Mwhile drawing to cycle the next segment's mode between a free straight line and a tangent arc, letting you mix straight and curved segments in one continuous chain. - Bi-Tangent Line — click two circles or arcs; Pingendum computes and adds the external tangent line connecting them, with tangent constraints applied automatically.
- Bisecting Line — click two lines; Pingendum adds a construction line along their angle bisector, through their intersection point.
- Normal To — click a curve, then click a point; Pingendum adds a line from the foot of the perpendicular on that curve to your clicked point, with a perpendicular constraint applied.
- Centreline — two clicks place a construction line tagged as a sketch axis. Mirror and Symmetry will take it as their axis, though not because of the tag: both accept any line or construction line, so a centreline qualifies simply by being one. What the tool does add is the constraint — draw it near-vertical or near-horizontal and Pingendum applies the matching H/V relation automatically, so a mirror axis locks cleanly rather than drifting.
Note
Polyline's mode-cycle key (
M) only applies while the tool is active and mid-chain — it doesn't collide with the Mirror shortcut covered in Transforming and Duplicating Sketch Geometry, since Mirror isn't reachable while Polyline has an in-progress chain.
Rectangle and Polygon Variants
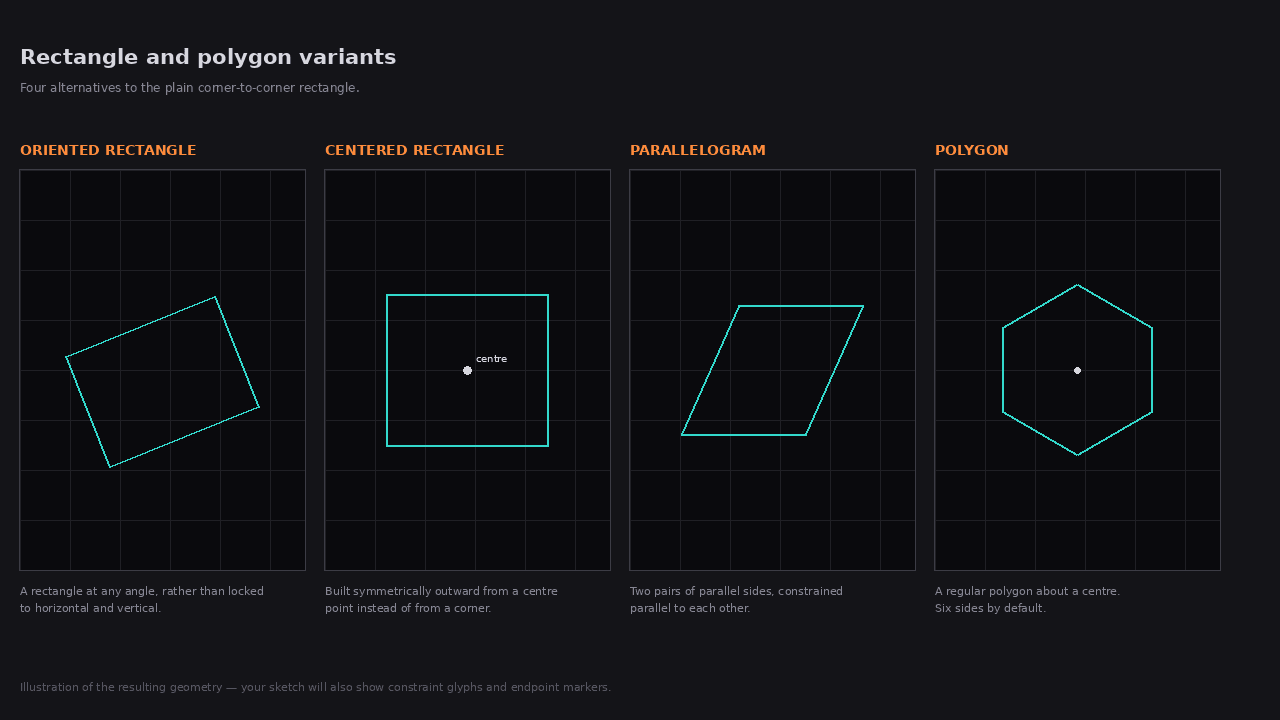
Beyond the plain corner-to-corner Rectangle tool (R):
- Oriented Rectangle — 3 clicks: one corner, an adjacent corner (this edge sets the rectangle's angle), then a third click sets the width. Unlike the standard rectangle, this one isn't locked to horizontal/vertical — use it for a rectangle at an arbitrary angle.
- Centered Rectangle — 2 clicks: center, then a corner. The rectangle is built symmetrically around your first click.
- Parallelogram — 3 clicks: corner A, adjacent corner B, then corner C adjacent to B. The fourth corner is computed automatically, and the two pairs of sides are constrained parallel to each other.
- Polygon (
Shift+P) — 2 clicks: centre, then a click setting the radius and rotation. Defaults to 6 sides. Four keys shape it, and all four work while you draw with the preview updating live:+/-change the side count (3 to 100),Mtoggles inscribed (radius to a corner) against circumscribed (radius to an edge midpoint),Cshows or hides the construction circle, andGswitches to Edge mode — where instead of a centre you click the two ends of one side and then pick which way the polygon builds.
Circle and Ellipse Variants
Beyond the plain center-then-rim Circle tool (C):
- Three-Point Circle — 3 clicks anywhere on the circle's circumference; Pingendum solves for the circumcircle that passes through all three. If the three points fall in a line there's no circle to draw, and the tool says so rather than guessing.
- Tri-Tangent Circle — click three existing lines, circles, or arcs; Pingendum solves for the circle tangent to all three (the classic Apollonius problem) and applies tangent constraints to each.
- Ellipse (
E) — 3 clicks: center, a point defining the major axis's length and rotation, then a third click setting the minor-axis radius by its perpendicular distance from the major axis. - Arc of Ellipse — a partial ellipse, in 5 clicks: centre, primary-axis tip (setting the semi-major length and the rotation), a click setting the minor radius, then the arc's start and end points. A faint full-ellipse guide stays on screen while you pick the limits, so you can see the arc you're cutting from it.
- Conic Segment — 4 steps: place the start point, the end point, a control apex, then set rho by dragging or typing. Rho runs between 0 and 1 and decides the family — below 0.5 elliptical, exactly 0.5 parabolic, above 0.5 hyperbolic — and the preview labels it live as you drag. At the rho step,
E,PandHjump straight to a representative value for each family (0.25, 0.5 and 0.75), which you then confirm with a click.Backspacesteps back one stage.
- Five-Point Conic — 5 clicks placing 5 points on the curve; Pingendum fits a general conic through all of them, automatically producing an ellipse, parabola, or hyperbola depending on the fitted shape.
Arc Variants
Beyond the plain Three-Point Arc (A — start, end, then a third point the arc bulges through):
- Center-Start-End Arc — 3 clicks: center, a start point (sets the radius), then an end point. The arc always sweeps the short way from start to end; redraw it if you need the long way around.
- Center-Radius-Sweep Arc — 3 clicks: center, a rim point (sets radius and start angle), then a third click whose angle from center defines how far to sweep. Unlike Center-Start-End, this variant supports sweeps greater than 180°.
- Tangent Arc (
Shift+A) — click an existing line or arc endpoint to read its outgoing tangent direction, then click a target end point. Pingendum computes an arc that continues smoothly (tangent) from that direction. Clicking on empty space for the first click falls back to a simple 2-point arc instead.
Splines
Both spline tools build the same kind of curve (a degree-3 B-spline) but let you define it two different ways:
- Control-Point Spline (
S) — each click places one control point; the curve is pulled toward each point without necessarily passing through it, the standard B-spline behavior. PressEnterto commit,Escapeto cancel,Backspaceto remove the last point, andFto toggle a closed (periodic) spline. Keys1–5set the curve's degree before or during the draw. - Interpolating Spline — each click places a knot the curve must pass through exactly. Pingendum fits a smooth curve through all your clicked points and converts it to the equivalent B-spline internally.
FandBackspacework as above, andPcycles the parameterization — how the fit distributes the curve between your points.
Use control points when you want to sculpt a curve's shape directly; use interpolating when you have specific points the curve absolutely must pass through.
Slots
- Straight Slot (
Shift+S) — 3 clicks: center, then a click setting the slot's direction and half-length, then a click (or drag) setting its width. Produces the familiar rounded-rectangle "stadium" shape used for adjustment slots and mounting hardware. - Centerpoint Slot — the same stadium shape built from its centre outward: click the centre, then a click setting direction and half-length, then the width. Use it when the slot's midpoint is the located feature rather than one end.
- Arc Slot — 4 clicks: center, a click setting the inner radius and start angle, a click setting the end angle of the sweep, then a click (or drag) setting the outer radius. This is a slot bent along an arc rather than a straight line.
- Three-Point Arc Slot — the same curved slot defined by points on its centreline instead of by a centre and angles: click the centreline start, the centreline end, a point the centreline passes through, then set the width.
Tip: slots and arc slots have edit handles
Select a finished slot and small grips appear on it — its ends, its width, and for an arc slot its radius, rotation and sweep. Drag one to adjust that parameter alone, without redrawing. Reading Your Sketch covers the handles; conics get them too.
Text Notes
Shortcut: Shift+T · ANNOTATE group
Not a shape, but it lives on the drawing alongside them: Text places a note.
Click where the note should sit and a Text dialog opens with four fields:
| Field | What it sets |
|---|---|
| Note | The text itself, over as many lines as you like. An empty note is refused |
| Paper height | Character height in millimetres on the plotted sheet, default 3.5 |
| Rotation | −360° to 360° |
| Justification | Left, Centre or Right, relative to the point you clicked |
Whatever you set becomes the default for the next note, so a drawing full of notes only needs setting up once.
Editing and moving a note
- Double-click a note to reopen the dialog with its current values. The dialog gains a Delete option when opened this way.
- Drag a note with the Text tool to reposition it. The whole drag is one undo step.
Notes are ordinary drawables in every other respect: they sit on a layer, they follow that layer's visibility and lock state, and they're selectable and deletable like anything else. Because they're painted above geometry, a click that lands on both picks the note.
Note: paper height, not drawing height
Height is measured on the sheet, not in drawing units — so a 3.5 mm note prints 3.5 mm tall whether the drawing plots at 1:1 or 1:50. That's what keeps notes readable at any scale, and it's the same rule the sheet applies to dimension text (Plotting and Printing).
Text notes can be kept off the sheet entirely with the Text notes checkbox in sheet setup.
Next Steps
You now know how to:
- Derive points from existing geometry with Intersection and Projection Point
- Build lines from geometric relationships — tangency, bisection, perpendicularity — instead of free clicks
- Reach for the right rectangle, circle, or arc construction when the basic click sequence doesn't fit your geometry
- Choose between control-point and interpolating splines
- Draw straight and arc-shaped slots, and adjust them afterwards with their edit handles
- Place, edit and move a text note, and control how it prints
This wraps up the sketcher's full drawing toolkit. The remaining chapters step back from day-to-day drawing and cover how a sketch reports on itself — the dimensions that annotate without driving, the checks that find problems before an export does, and the colours that tell you what's still loose.
Transforming and Duplicating Sketch Geometry
Copy or reposition existing sketch geometry with Mirror, Translate, Rotate, Scale, and Symmetry, instead of redrawing it by hand.
Reference (Driven) Dimensions
Understand driven dimensions — measurements that report a size without constraining it — and the conflict policy that is currently the only way to create one.