
Hatching an Area
Fill a closed area with a section pattern or a solid colour, choose its pattern, scale and angle, and understand how a hatch follows the outline it was made from.
A section view, a cut face, a filled region on a plan — a drawing often needs an area filled rather than outlined. Hatch fills a closed area with a pattern of lines, dots or a solid colour, and keeps that fill matched to the outline as you edit it.
Prerequisites
Before you begin, ensure that:
- You have a drawing with a closed outline to fill — a rectangle, a circle, or any chain of curves whose ends meet. Drawing Basic Shapes covers drawing one.
Starting the Hatch Tool
Hatch is on the Annotate partition of the second command row, and in the Annotate menu. Command search (Ctrl+Shift+P) finds it by name, or as "fill", "crosshatch" or "section". It has no keyboard shortcut.
A hatch describes an area that other geometry already bounds, which is why it sits with text in Annotate rather than with the drawing tools.
Two Ways to Say What to Fill
Hatch works in one of two modes, shown as Boundary on the Tool Options row. Press B to switch between them.
Pick a point
This is the mode Hatch starts in when nothing is selected. The prompt reads "Click inside an area to fill it".
- Start Hatch.
- Click anywhere inside the area you want filled — not on its outline.
- The area is filled, and the status bar says "Filled one area."
The tool stays active, so each further click fills another area. Press Escape when you're done.
Use the selection
This is the mode Hatch starts in when you already have geometry selected. The prompt reads "Click curves to bound the fill, then Enter".
- Select the curves that bound the area — or start Hatch first and click them; each click adds or removes a curve.
- Press
Enter, or click Fill on the Tool Options row. - Every area the selection encloses is filled, each as its own hatch: "Filled 3 areas."
Use this mode when the outline has so many pieces that a click inside might find the wrong area, or when you want several areas filled at once.
Islands
When one closed shape sits inside another, the fill alternates: the outer area is filled, the ring inside it is left empty, the area inside that is filled again. So hatching a plate with holes fills the plate and leaves the holes clear — no extra step needed.
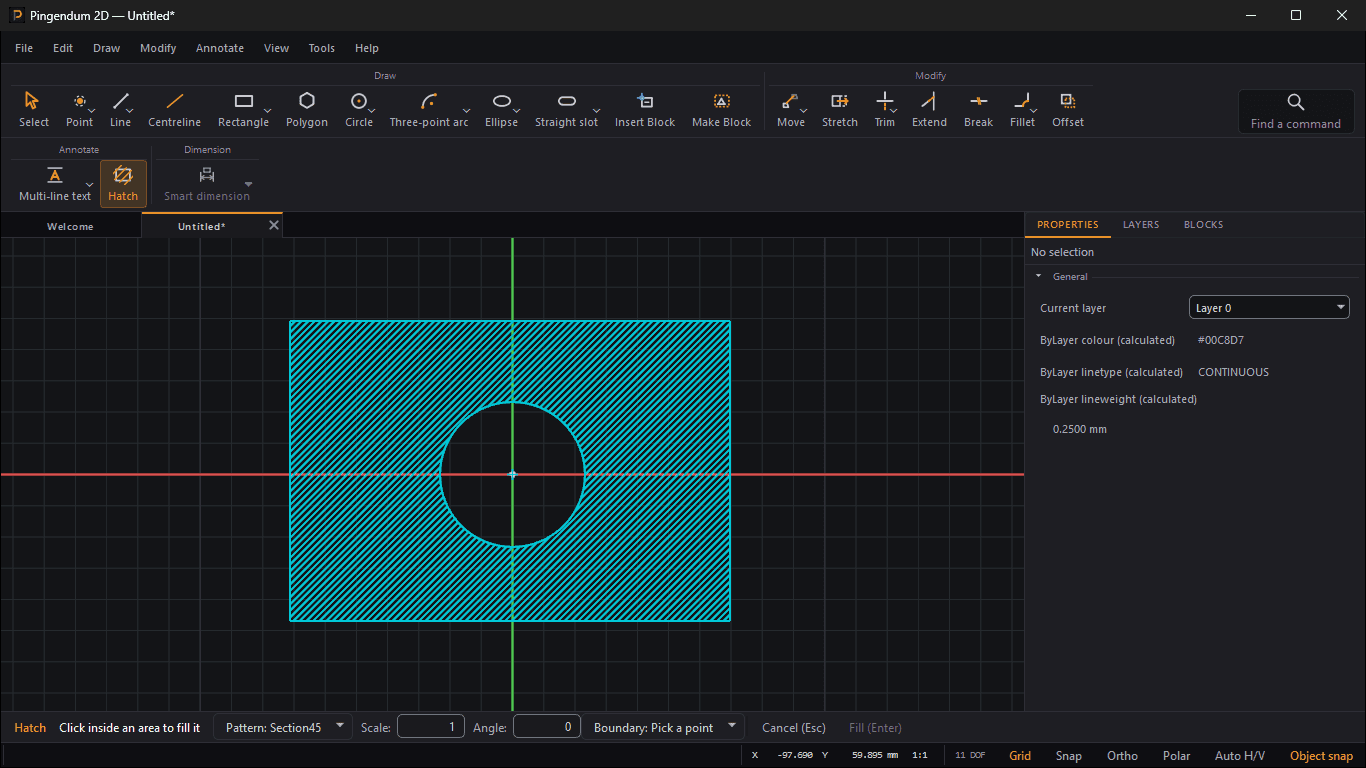
Pattern, Scale and Angle
The Tool Options row sets how the next hatch looks:
| Option | What it does |
|---|---|
| Pattern | Which fill to use. The drop-down shows a picture of each pattern, drawn at the current angle, since names like Section45Paired don't say much on their own |
| Scale | A multiple of the pattern's own spacing — 2 draws its lines twice as far apart. Not shown for Solid |
| Angle | Turns the pattern, in degrees, on top of the angle it's already defined at. Not shown for Solid |
Boundary (B) | Pick a point or Use the selection, as above |
Pattern, scale and angle are remembered between sessions, so a drawing's sections come out consistent without setting them each time. Each hatch stores its own settings, so changing them later affects only the next hatch.
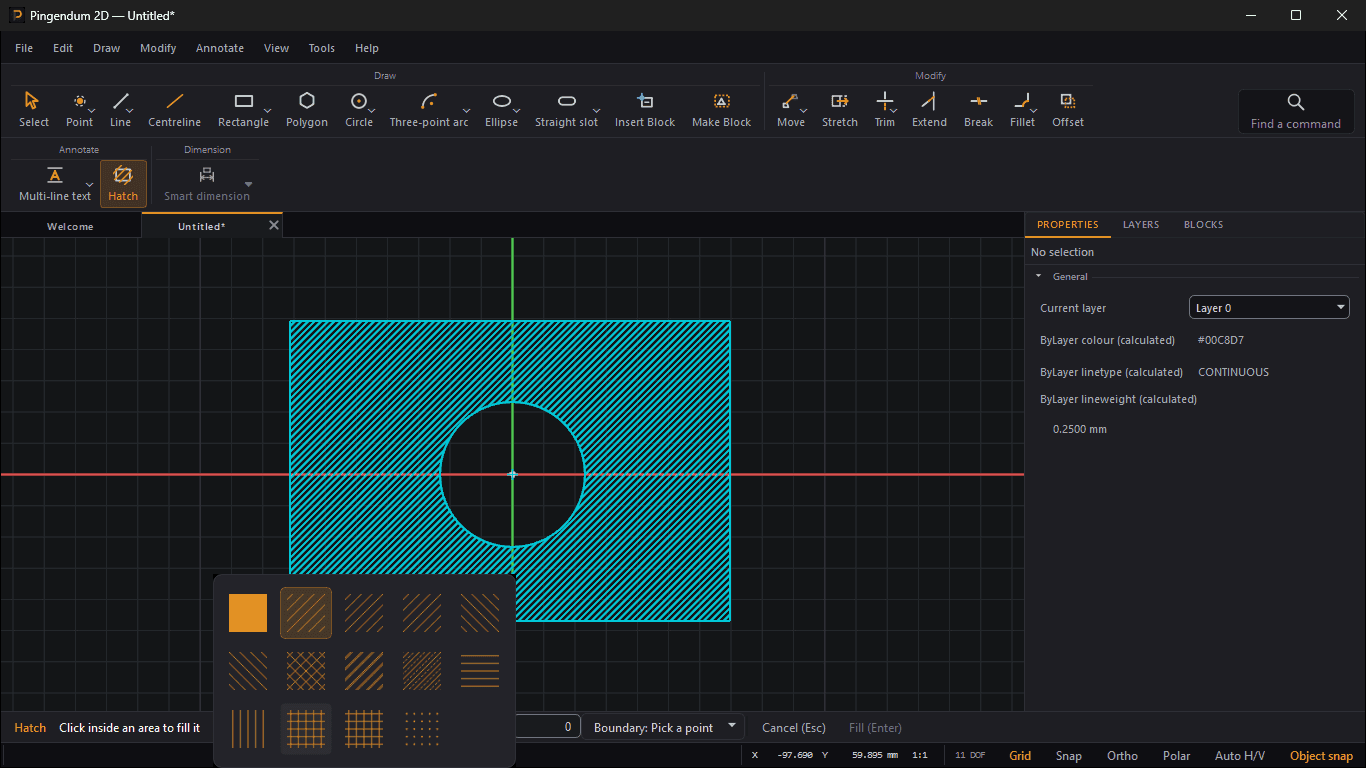
The patterns
Thirteen patterns ship with Pingendum 2D, all drawn to ISO conventions, plus Solid:
| Pattern | Looks like |
|---|---|
| Section45 (default) | Lines at 45° — the ISO 128-50 default for a cut face |
| Section45Fine / Section45Wide | The same, closer together for small areas or further apart for large ones |
| Section135 / Section135Fine | Lines at 135° — for the adjacent part |
| Cross45 | Crosshatch at 45° and 135° |
| Section45Paired | Paired lines at 45° |
| Section45Dashed | Alternating continuous and dashed lines at 45° |
| Horizontal / Vertical | Straight horizontal or vertical lines |
| Grid / GridFine | A square grid, normal or close |
| Dots | A square grid of dots |
| Solid | The whole area filled in the hatch's colour |
Section45 already runs at 45°, so leave Angle at 0 for a standard section. To tell two adjacent parts apart, give the second one Section135 — or keep the pattern and change the angle.
Note: the ISO spacing hint
ISO 128-2 asks for section lines at least 0.7 mm apart on paper. If the drawing has a fixed plot scale and your pattern and scale would put the lines closer than that, the Tool Options row says so — "At this drawing's scale these lines land 0.45 mm apart on paper. ISO 128-2 asks for at least 0.7 mm." It's advice, not a refusal; you can still hatch.
Text Inside a Hatch
A hatch is interrupted around any text note inside it, with a little clearance, so the note stays readable. This is what ISO 128-50 asks for. Move the note and the gap moves with it. Construction-geometry notes don't interrupt the fill.
When an Area Can't Be Filled
Hatch refuses rather than guessing, and the status bar says why:
| Message | What it means |
|---|---|
| "Nothing encloses that point." | The outline has a gap. The unconnected ends near your click are marked on the drawing, so you can see where to close it |
| "That point is on a curve. Click inside the area instead." | You clicked the outline itself |
| "The selection does not enclose an area." | In Use the selection mode, the selected curves don't close up |
| "That area already has this fill." | The area already carries a hatch with the same pattern, scale and angle |
| "At scale N this pattern needs more marks than a hatch may hold. Use a larger scale." | The scale is too small for the area |
| "At scale N the pattern leaves no mark inside that area. Use a smaller scale." | The scale is so large no line falls inside |
Two notes can come with a successful fill:
- "That area already carried a fill; this one is drawn over it." — a different fill on the same area is allowed, because some material symbols combine two patterns. If you didn't mean it, undo.
- "One curve across it could not bound a hatch, so the fill may run past where it should stop." — something lying across the area couldn't be used as an edge. Check the result.
A Hatch Follows Its Outline
A hatch remembers the curves it was made from. Edit the outline — move a corner, stretch it, trim it — and the hatch refills the new shape automatically. That's what makes it safe to hatch early and keep drawing.
If an edit breaks the outline so it's no longer closed, the hatch keeps showing the last area it filled rather than vanishing, and the status bar says so once: "A hatch no longer follows a closed boundary; it is showing the area it last filled." Undo the edit that broke it, or delete the hatch and fill the area again.
Detaching a hatch
To stop a hatch following its outline — to freeze it where it is — right-click it and choose Detach hatch. It keeps the area it's showing now, and later edits to the curves around it leave it alone. The status bar confirms: "The hatch no longer follows its boundary."
Selecting, Deleting and Moving Hatches
- Select a hatch by clicking inside it. Hatches draw beneath geometry and are picked last, so a click on a curve still picks the curve.
- Delete it with
Deletelike anything else. - To stop clicks and selection boxes picking hatches at all, turn off Edit → Selection filter → Pick hatches.
- A hatch isn't dragged or transformed on its own — Move, Rotate, Scale and Mirror skip it. Move its outline instead, and the hatch follows.
Note: changing an existing hatch
In this release the Properties panel doesn't list hatches, so a hatch's pattern, scale and angle can't be changed after it's made. To change one, delete the hatch and fill the area again.
Layer, Colour and Weight
A new hatch goes on the current layer and takes that layer's colour, like any other object. Its lines, though, are always drawn thin and continuous — the ISO narrow line — whatever lineweight or linetype the layer has, so hatching a heavy outline layer doesn't give you heavy hatching. On screen and on paper, hatches draw beneath the geometry around them.
Printing and Exchange
- Hatches print and export to PDF exactly as they look on screen — see Plotting and Printing. Turning a layer's Include in print/PDF off keeps its hatches off the sheet too.
- DXF export writes a real
HATCHentity in AutoCAD 2000, which the receiving system can restyle. AutoCAD R12 has no hatch entity, so the fill is written as the lines, dots and solids it draws. See Exchanging Drawings as DXF. - DXF import brings hatches in as hatches, keeping their pattern.
Next Steps
You now know how to:
- Fill an area by clicking inside it, or fill everything a selection encloses
- Choose a pattern, scale and angle — and why Section45 needs no extra angle
- Read what Hatch says when it can't fill, and find the gap in an outline
- Rely on a hatch to follow its outline, and detach it when you don't want that
- Select, delete and filter hatches, and know why they don't move on their own
Next: Working with Blocks
Working with Text
Place single-line and multi-line text notes on a drawing, set how they look, and edit or move them afterwards.
Working with Blocks
Turn geometry into a reusable block, place it as many times as you need, change every placement at once by redefining it, and explode a placement back into plain geometry.