
Constraining a Sketch
Learn to read the DOF indicator and use the constraints that pin down a sketch's size — Horizontal, Vertical, Length and Radius — and understand what currently stops a 2D sketch reaching zero degrees of freedom.
Whatever you drew in the last chapter is only roughly right — a rectangle that's approximately the size you wanted, sitting approximately where you clicked. Constraints are how you turn "approximately" into "exactly": fixed dimensions and relationships that Pingendum will hold onto even if you come back and edit the sketch later.
Pingendum has a full palette of constraints. This chapter covers the four that will carry nearly all of your work — Horizontal, Vertical, Length and Radius — plus Coincident and Distance, which you should know about but which the current build cannot yet apply to drawn geometry. The rest (Parallel, Perpendicular, Tangent, Equal, Concentric, and more) are covered later, in The Complete Constraint Toolkit, once you're working with geometry that actually needs them.
Before you start: 2D sketches usually stop short of zero
Every constraint that positions geometry needs a point in the selection, and the endpoints and corners of drawn geometry cannot currently be selected — clicking a corner picks the line that owns it. Sizes you can pin down completely; positions you generally cannot.
In practice a well-constrained 2D sketch sits at a small non-zero DOF count with its shape and size fully determined. That is normal here, and the worked example at the end shows exactly where it lands and why. The Complete Constraint Toolkit covers the limitation in full.
Prerequisites
Before you begin, ensure that:
- You've completed Drawing Basic Shapes and have a rough shape — a rectangle is a good example — drawn in an active sketch.
Reading the DOF Indicator
Look at the status bar at the bottom of the window. It shows a number followed by DOF — degrees of freedom — which counts how many ways your sketch's geometry could still move or resize without breaking any constraint you've applied so far.
As you add constraints, this number drops. When it reaches 0, the readout itself changes from a count to the words Fully constrained. That readout is the only place the sketch's solver state is reported — there is no badge on the canvas and no coloured highlight to go with it.
You don't have to reach 0 to move on — and on most 2D sketches you won't be able to, for the reason in the note above. What matters is that the sketch's size and shape are determined, so nothing changes underneath you when you drag something or edit a dimension. A degree of freedom left in position is harmless. One left in size is not.
The Properties Panel
The dock on the right is Properties and Layers, opened from View → Panels (Ctrl+1). Its Properties tab is selection-driven: it shows you what the selected thing is, rather than listing everything in the sketch.
A header names what you have selected — No selection, Line, or 8 objects — and below it the applicable sections appear:
- General — the object's layer, colour, linetype, lineweight and whether it's normal or construction geometry. With nothing selected, this shows the drawing's current defaults instead.
- Geometry — the coordinates, length, radius, diameter or angle of a single selected entity, editable in place. Shown for one object at a time.
- Constraints and dimensions — for a selected constraint or dimension: whether it's driving or driven, its value or formula, and its tolerance, precision and prefix/suffix.
Select several objects and you get only the properties they share; where their values differ, the field reads Varies, and committing a new value applies it to all of them as a single undo step.
Note
There is no list of every constraint in the sketch. To inspect or delete one, select the constraint itself in the viewport. To find out whether the sketch as a whole is over-constrained, run Drawing → Validate drawing (Diagnosing Sketches) — that's where redundancy is reported.
Auto H/V: Constraints You Might Already Have
Before applying anything manually, check your DOF count — it's probably lower than you'd expect. That's because of Auto H/V, a toggle on the sketch toolbar that's on by default. Any time you draw a line that's close to perfectly horizontal or vertical, Pingendum automatically applies that constraint for you.
A freshly drawn rectangle starts at 4 DOF, not 8 — all four sides are already locked to horizontal or vertical, leaving only width, height, and position (x, y) still free.
Note: a rectangle's constraints don't come from Auto H/V
The Rectangle tool applies those four constraints itself, as part of building the shape — turning Auto H/V off doesn't change it, and a rectangle is still 4 DOF either way. It has to: a "rectangle" whose sides weren't horizontal and vertical wouldn't be one.
Auto H/V is for geometry you draw freehand — lines, polylines and the like — where an axis-aligned segment is your intent rather than the tool's.
Coincident
Selection: exactly 2 points.
Forces two points to occupy the same location — for separate entities whose endpoints are meant to touch but didn't snap together exactly.
Not currently reachable
Coincident needs two points in the selection, and you cannot select the endpoint of a drawn line: clicking a corner selects the line. The button stays greyed out no matter what you pick, so this constraint cannot be applied in the current build. See The Complete Constraint Toolkit.
What to do instead: get the endpoints coincident as you draw, by letting them snap together. Object snaps catch an existing endpoint while a drawing tool is active, and the new geometry then shares that point outright rather than needing a constraint to hold it. Closed shapes drawn with the Rectangle, Slot or Polyline tools are already joined this way. Precision Object Snaps covers the snapping tiers.
Horizontal / Vertical
Selection: one or more lines.
Shortcuts: H (Horizontal), V (Vertical)
Forces a line's two endpoints to share the same vertical or horizontal position. You'll rarely need these manually since Auto H/V already applies them as you draw — but they're here for the cases where Auto H/V didn't catch it, or you want to force it after the fact. You can select several lines at once and apply either constraint to all of them in one action.
Distance vs. Length — Which One Do You Want?
These two are easy to mix up, so it's worth being precise:
- Length measures a single line's own length. Selection: exactly 1 line.
- Distance measures the gap between two points. Selection: exactly 2 points — and no other pairing at all; it will not take two lines, or a line and a circle.
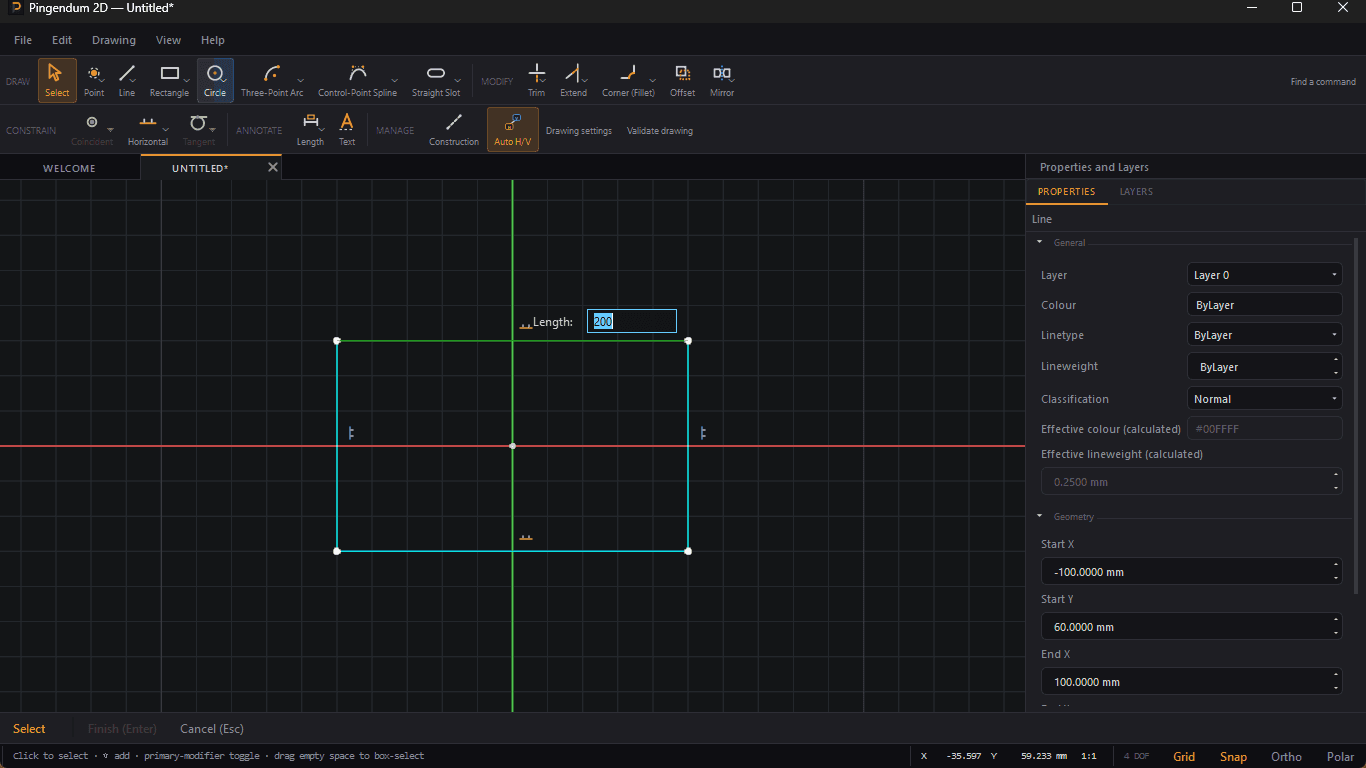
Length is the one you want, and the one you can use. For a rectangle's width or height, click the edge itself — the middle of the line, not either corner — then apply Length. A small input box appears on the canvas next to the geometry, pre-filled with its current measured value. Type the value you want and press Enter to commit, or Escape to back out without changing anything.
Distance is not currently reachable
Because it takes only points, and drawn endpoints cannot be selected, Distance cannot be applied in the current build. Selecting two entities and trying it is refused with "This does not apply to the current selection."
Where you would reach for Distance to space two features apart, there is no substitute today — place them by eye, or type exact coordinates into the Geometry section of the Properties panel, which sets a position without constraining it.
Tip: double-click a dimension to change it later
Once a dimension is on the canvas, double-click its label to reopen that same input box, pre-filled with the current value. It works for every dimension kind — length, distance, radius, diameter and angle — and it's much quicker than deleting the constraint and reapplying it.
Note: how dimension labels read
Labels carry a prefix that says what kind of dimension they are: a radius reads
R25.00, a diameter⌀50.00, an angle45.00°. Plain lengths and distances have no prefix — just the number.That's how you tell a radius from a diameter on a busy drawing without selecting anything.
Radius
Selection: exactly 1 circle or arc.
Select a circle or an arc, apply Radius, and the same inline number prompt appears — type the radius you want, Enter to commit.
Tip: Smart Dimension
Instead of picking the exact constraint each time, you can use Smart Dimension — shortcut
D. It reads your selection and applies whichever dimension fits: the length of a line, the angle between two lines, and for curves a full circle as its diameter and an arc as its radius. It's usually the quickest way to add a dimension; reach for the specific constraints above only when you want to force a particular one (a circle's radius rather than its diameter, say).If the dimension button in the ANNOTATE group looks greyed out, that is the split button showing whichever dimension you used last — and it disables when that one doesn't suit your selection. With a circle picked, for instance,
Lengthis greyed and its dropdown will not open. PressCtrl+Shift+Pand search the dimension by name to reach it regardless.
Worked Example: Fully Constraining a Rectangle
Putting all of this together on the rectangle from the last chapter:
- Draw a rectangle. Check the DOF count — with Auto H/V on, it should already read 4 DOF, not 8.
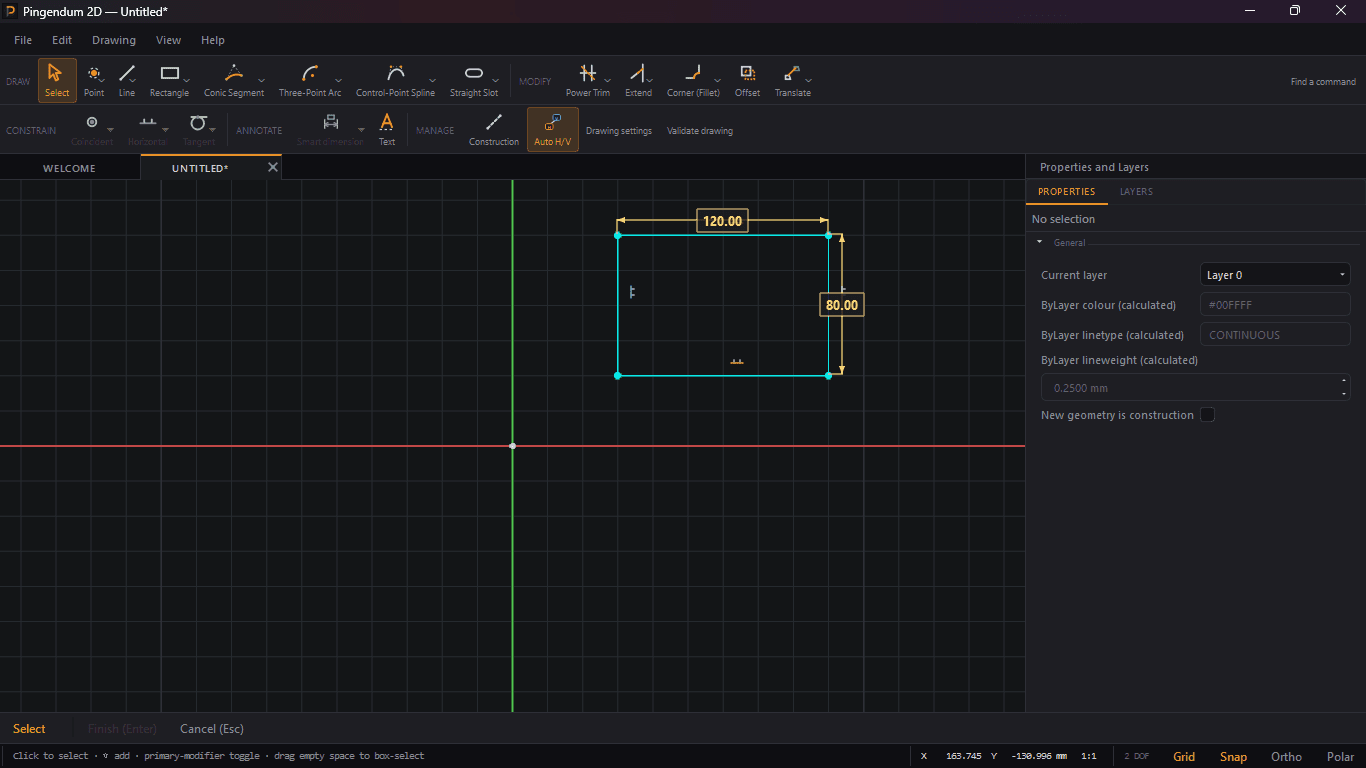
- Switch to Select, click the middle of one horizontal edge (not a corner), and apply Length. Type a value,
Enter. - Click the middle of one vertical edge, apply Length again, type a value,
Enter. - Watch the DOF counter — it should now read 2 DOF, not 0.
Those four degrees of freedom were the rectangle's width, its height, and its position — the x and y of the whole shape. Two Length dimensions fix the size, which is why the count halves rather than reaching zero. The rectangle is now a fixed size that can still slide around the drawing.
Size is usually what you care about, so stopping at 2 DOF is a perfectly reasonable place to leave a sketch, and it is where most of your sketches will sit.
Pinning the position too is not currently possible on a shape like this. Every constraint that would do it needs a point — Coincident, Distance, the coordinate dimensions — and a corner cannot be selected. The one positional constraint you can reach is Fix, and Fix applies to whole entities: fixing a line pins both its endpoints, four constraints at once.
That is always more than a rectangle has room for, whichever order you work in:
| What you do | What the status bar says |
|---|---|
| Fix one edge of a freshly drawn rectangle | Over-constrained (1 redundant) |
| Fix one edge after adding both Length dimensions | Over-constrained (2 redundant) |
Fixing before dimensioning doesn't help, because the edge is already constrained Vertical — so pinning both of its endpoints says the same thing twice no matter what else is present.
So leave it at 2 DOF. That is the correct end state for this shape in the current build, not a step you failed to finish.
Tip: a greyed-out constraint is telling you about your selection
Constraint and dimension buttons are enabled only when the current selection matches what they need. With nothing selected they are all grey; select two lines and Parallel wakes up while Coincident stays grey.
Hover a greyed-out button to find out why. Its tooltip carries the reason — "Select the geometry to apply this to." with an empty selection, or "This does not apply to the current selection." when what you've picked is the wrong type or count. That tooltip is the fastest way to see what a constraint wanted versus what you actually have.
The same rule governs the right-click menu, which projects the same buttons — see The Complete Constraint Toolkit.
Next Steps
You now know how to:
- Read the DOF indicator and tell a finished sketch from an underdefined one
- Rely on Auto H/V for horizontal and vertical edges
- Apply Horizontal, Vertical, Length and Radius, and recognise why Coincident and Distance stay greyed out
- Pin a rectangle's size, and know why its position stays free
With a fully defined shape in front of you, it's worth saving your work before going further.
Next: Saving and Managing Projects
Drawing Basic Shapes
Learn to draw with the Select, Point, Line, Rectangle, Circle, and Arc tools — enough to build your first closed profile.
Saving and Managing Projects
Save your work, recognize unsaved changes, reopen projects, and understand the autosave, crash recovery and read-only protections behind them.